Chevron Stitch Scarf - Reversible & Convertible to Hood


Herringbone Chevron Scarf Directions
Materials:
310 - 330 yards (280 - 295 m) Extra Super Bulky (Jumbo) yarn @ 2WPI
Samples used Berocco Sundae (62 yds/57 m each) - which is now discontinued - Malabrigo Rasta or Cascade Magnum are good substitutes.
on US 15 (10 mm) Needles Sample took ALL of all 5 hanks, so you may want to get 6 just in case.
on US 19 (15 mm) Needles Sample took 4 hanks for body plus some for fringe
Measurements:
Aprox 9.5"(24.4 cm) wide on US 15 (10 mm) needles
and 11.5" (29 cm) wide on US 19 (15 mm) needles
Both 84"(213 cm) long ~ without fringe
On the smaller US 15 (10 mm) needles I used 3 stitch Seed edging on each side (for this always do K1, P1, K1 for the first and last 3 stitches, no matter which side you're working)
On the larger US 19 (15 mm) needles I used only a 2 stitch Garter edge on each side (it was just a tad too wide for me with 23) but you can do however many edge sts you want - in seed, garter, slip sts whatever you like.
So on US 15 (10 mm) needles CO 23 sts, ~ this count includes the 3 seed sts for each edge --
or on US 19 (15 mm) CO 21, ~ this count includes 2 garter sts for each edge.
The directions that follow are for the 17 stitch center chevron only - you need to add in your chosen edging sts yourself - I find it easiest to put in stitch markers denoting/separating edges from main pattern stitches
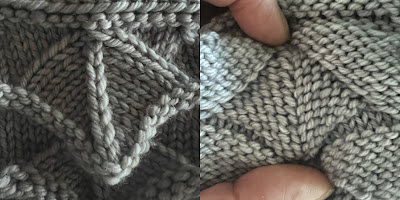
Row 1 (RS): [p2, k2] 2x, p1, [k2, p2] 2xRow 2 (WS): k1, p2, k2, p2, k3, p2, k2, p2, k1Row 3: [k2, p2] 2x, k1, [p2, k2] 2xRow 4: p1, k2, p2, k2, p3, k2, p2, k2, p1
Repeat these four rows to approx 42" (106.5 cm) ending with a row 4.
Place these stitches on holder.
Make a second piece the same way and join with 3 Needle Bind Off or Graft.
You do not have to make two pieces, you can make it as one long piece, but I like the points facing downward on both ends.
If you want fringe: Cut pieces of yarn 8" long - 93 for 23 st- sz 15 version// 86 pieces for 21st -sz 19 version. Fold two in half together and with a crochet hook pull them through the cast on loops on each end, pull loose ends through fold loop and snug them down to the CO edge, make sure each end of the Scarf has the knots facing the same side of the work.

These are great they make any scarf or cowl a LOT more versatile than
sewn on buttons - plus, you flip them over and there's yet another look
with the other color/different style of buttons! Picture above is an example of an Anywhere Button ~ note this is not the one I used for the sample, I cannot find a picture of them loose and the Sample is long gone.
To button: Fold the scarf in half long ways and then lap the edges of one side
over the other about 1"(2.5 cm), put the first anywhere button thru both
layers about 12"(30.5 cm) down from the fold, and put the other 2 in evenly
spaced towards the fold -- See picture below.


Comments
Post a Comment